
5INCH Fever Camera Terminal Operation manualIssuing time:2020-05-27 22:12 Human Living Body Temperature Detection And Face recognition Terminal Operation manual (please read carefully before using the product)
Attention This operation manual is for reference only. All appearance and functions of the product are subject to the actual product This product can be equipped with optional modules such as 4G, WiFi, ID identification, Weigen IC card reader, etc. Please refer to the actual product Do not aim the lens of the device at the object with strong light, as it will affect the capturing effect, or even damage the lens Please configure all passwords and other relevant product security settings, and take good care of your user name and password Biometrics products cannot be 100% suitable for any security environment or high security use, please use combination authentication The firmware of this device will be updated from time to time. For your better experience, please timely maintain and upgrade Product overviewProduct introductionThe human livding body temperature detection and face recognition terminal is a face comparison terminal product, providing human livding detection, body temperature detection, face capture and comparison and other basic functions. Wifi function, 4G, IC, ID and other corresponding software and hardware modules optional(Standard one do not include these features). It provides a more secure and convenient scheme for people access management. The device can be widely used in building access control, attendance, airport station security, community access control and other scenes. Product features2MP HD video, integrated face capture and recognition. Abormal Temperature Alarm: Non-contact body temperature detection within One second, Forehead temperature testing distance: 25--40cm; Wris temperature testing distance: 0-3cm. Temperature detection error range±0.5℃.Abormal temperature trigger voice alarm and alarm output. Double sensor design, infrared vivo detection algorithm, effectively prevent photos and video fraud. IC card +ID card function module optional(not include), can achieve 1:1, 1: N comparison mode. The face recognition distance is within 0.5-3 meters, and the face can be recognized and registered in the picture across 260 pixels or more. Face detection technology based on improved multi-task cascade convolution neural network is adopted to reduce the requirement of image quality and greatly improve the detection speed of face. With the deep learning algorithm, support 10000 face database storage. Support local login to query and setup device parameters, view real-time monitoring and face comparison results. Support to configure device parameters in central center, provide security authentication. Flexible face data import, support single, batch picture file import and real-time snapshot import. Support common person, white list person, blacklist person etc., different face type. Support voice broadcast after face recognition Support TFTP upload face recognition data. Support to run in offline mode Support TF card storage, can store 10W face capture and recognition records. Provide 485, I/O input and output, wigan and other peripheral interfaces. 4G module is optional to meet the needs of wireless transmission applications.
|

.pngF04B英文(1)")


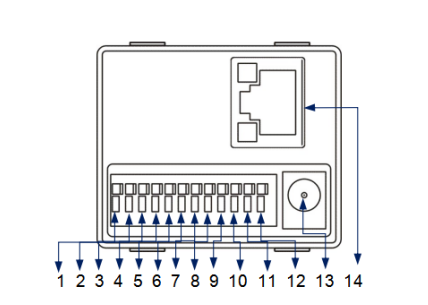
1 | RS485A | 8 | ALAM_ON(Relay normally close ) |
2 | RS485B | 9 | ALAM_COM |
3 | GND | 10 | ALAM_OFF(Relay normally open) |
4 | WGD1(Wiegand 1) | 11 | GND_IN(12V) |
5 | WGD0(Wiegand 0) | 12 | 12V0_IN(12V) |
6 | GND | 13 | POWER |
7 | ALAM_IN | 14 | RJ45 |
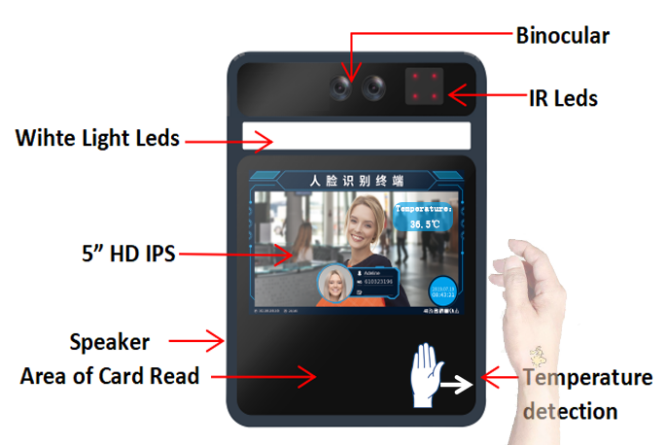
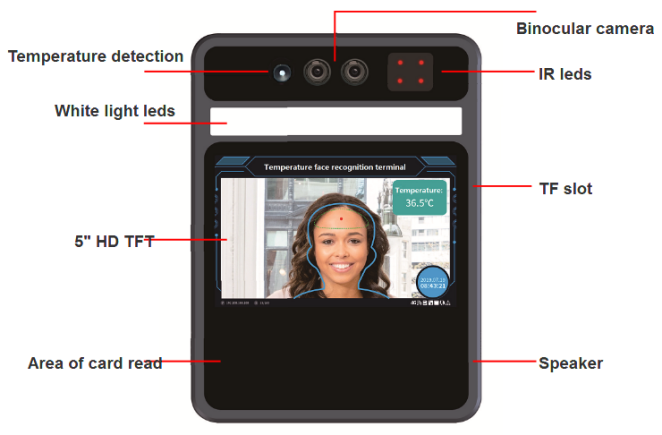
LCD Display Instruction
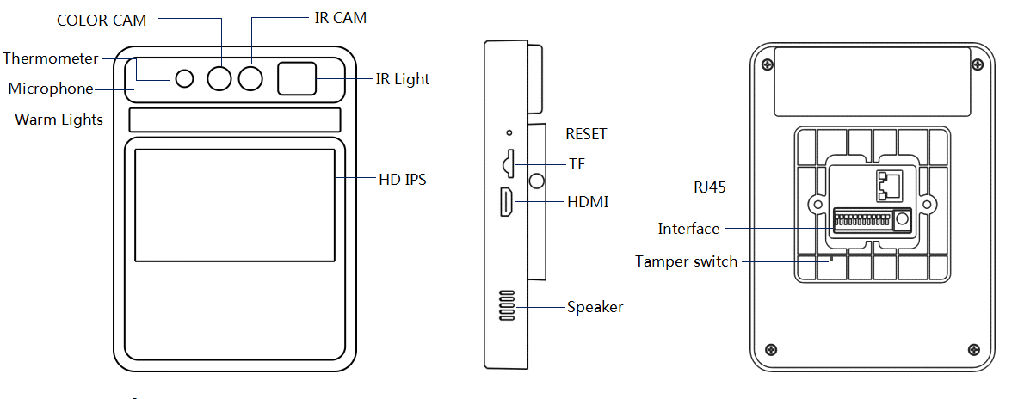
Forehead Temperature Detection Device Wrist Temperature Detection Device
4 Client software
4.1 Control ActiveX installation
Login the device with Internet explorer browser and enter the IP address in the url bar. The device's default IP is 192.168.1.189 (or check the IP in the lower right corner of the device display screen after the power on). After login, download the control and install the control according to the prompts.
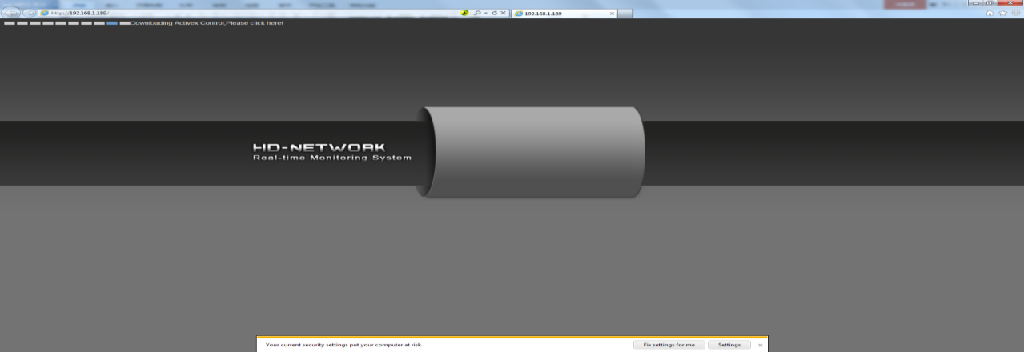
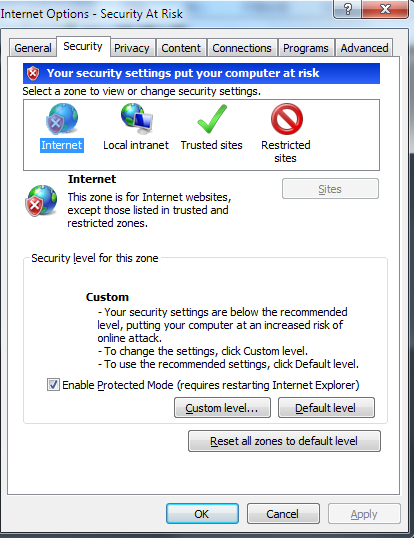
Note: if unable to download, modify Internet explorer browser "tools" menu options, tick off the protected mode.
4.2 Login interface
After installing the control, the desktop will generate the application icon . Double-click to run, and the following login interface will appear.Enter the device password (default is 888888) and click the "login" button to log in the device.

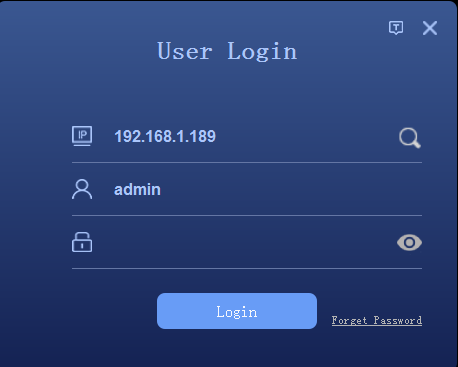
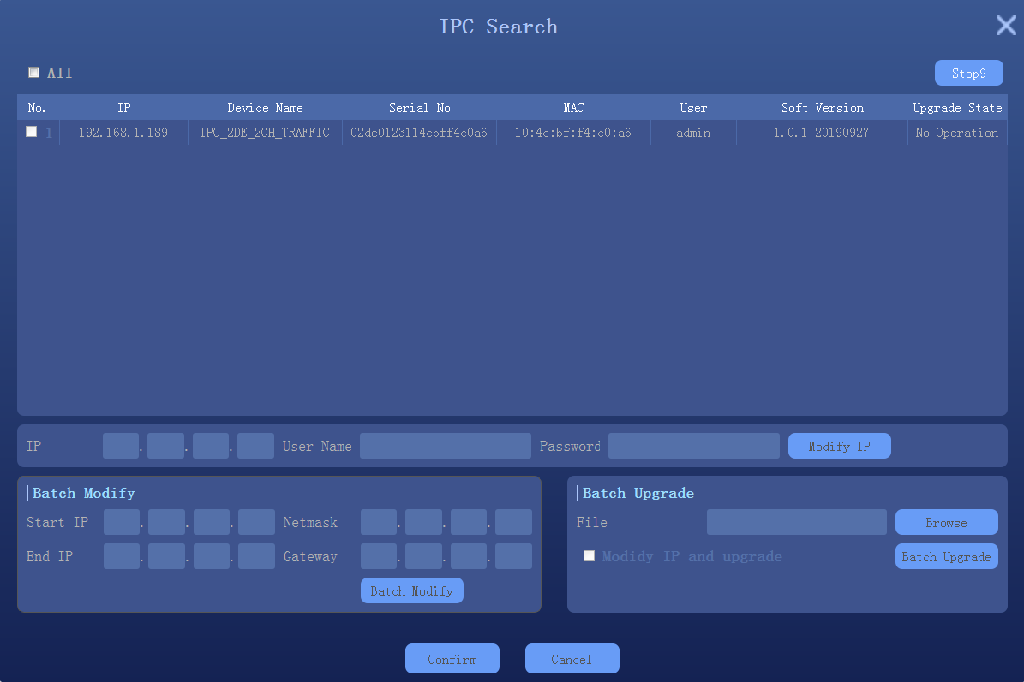
Or click  to enter the device search interface, click the "search" button to search the device and select the device to log in.
4.3 Preview

Live preview window
Recognition results display: Similarity, Name, Description, Group, Temperature
Live face capture picture display: Capture time, temperature
4.4 List management
List management, face database management, single face registration, batch face registration, real-time face image import.
4.4.1 Face picture requirements
To ensure the accuracy of the recognition, use a recent and new photo. Only one face in the picture has a width of 260 pixels or more.

Note: face image must not be more than 1M, so as to avoid failure when importing face library
4.4.2 Single face import
Select "list management" to enter the list management interface, as follows.
Steps:
Add group: set the group name and group type (whitelist, blacklist or visitor)
Description:
Visitor type grouping, setup the time period, and check, then the face data will be automatically deleted from the face library after reach the expiration time.
Select add new face
Click [browse] to check the location of face photo and select
Fill in name, ID, Information.,etc
Click “confirm” to end
4.4.3 Batch add
Select "list management" to enter the list management interface, as follows.
Steps:
Add group: set the name and group type (whitelist, blacklist or visitors)
Select "add multiple faces"
Click to setup face image import format; Note: the face photo naming format should be corresponding to avoid import failure
Click [browse] and select the folder corresponding to face library
Click confirm and wait for the import to complete the import
4.4.4 Real-time face image import
In Preview interface, when a person passes by the device, the device will keep to capture the human face. Click the icon on the right side of the human face to view the picture captured in real time, as shown below:
In the face history, select the face image as the template to import into the device
Note: For this import mode, groups need to be setup in advance in the list management
4.4.5 Binary format face library import
The device supports one or more binary format grouping face library import, select "single bin file" or "multiple bin file" respectively, as follows
4.4.6 Exported face library
In the list management screen, see below
Click export face list;
Setup the save path of face library export
According to the group name, automatically export all groups in the face library, save the format as binary (.bin) file
When finished, click "ok"
4.5 Peripheral control
4.5.1 Basic setup
4.5.2 Gate control
Gate open type: can select relay or wegan two ways.
Relay. : relay channel 0 (out0) or relay output channel 1 (out1).
Delay time: hold time of opening state.
Open mode:
Face: The capture face matched the face in database to open the gate.
Unification of face and ID card: The capture face matched the face in ID card to open the gate
Pass the gate: Once someone to open the gate
4.5.3 GPIO control
4.5.4 Wiegand setup
Wiegand protocol(output):Wiegand 26/36/66 optional
Wiegang number:To test the effect of wiegand number。
Wiegand protocol(input):Wiegand 26/36/66 optional
4.5.5 Display Settings
Click Peripheral->Display, to access the display setup
4.5.6 Fill Light
Click Peripheral->Light, to access the fill light interface
To test the compensation light work status
4.5.7 Serial Port
Click Peripheral->Port, to access the Serial port setup
Port Type:Send/Receive
4.6 System configuration
4.6.1 Time setup
Click [System] → [Time] to enter the time setting interface.
Device date: To configure the device time. Mode: Manual modify and PC synchronization.
NTP: The device synchronize the time with the network NTP server
4.6.2 Network Settings
Click [System] → [Network] to enter the network settings interface
4.6.3 P2P
Click System Configuration--> P2P, to access the P2P setup interface
4.6.4 TF Card
Click System Configuration-->TF card, to access the TF card setup interface
4.6.5 User management
Click [System] → [User] to enter the user management interface
4.7 Parameter Settings
4.7.1 Face detection
Click [System] → [Parameter] → [face detect] to enter the setting interface
Enable temperature checking
Normal Temperature degree:To setup a default temperature here. The alarm will be triggered once the temperature detected is higher than the default value.
Temperature correcting:to compensate according to the real temperature
4.7.2 Minimum size of Detection object
Click System-->Parameter-->Detect Min Area
The size of detection object is 1-82 adjustable, you can setup the minimum object size to detect
4.7.3 Face schedule
Click System → Parameter → Face Schedule
Click [add] to enter the scheduling time setting interface. There are 6 time periods in total
4.7.4 Scene Audio
Click System → Parameter → Scene Audio
Broadcast mode can be customized
All voice reminder can be imported and record(Windows PC support TTS function)
4.7.5 OSD
Click [System] → [Parameter] → [OSD] to enter the setting interface
4.7.6 Video setup
Click [System] → [Parameter] → [Video] to enter the setting interface
4.7.8 Factory calibration
Click System configuration-->Parameter setup-->Factory calibration
4.8 Data upload
Click [System] → [Upload] to enter the FTP upload setting interface.
Enable FTP upload
Setup the FTP server address
Setup the FTP port, 21 in default
Setup user name and password
Set upload path
Click test to verify that the Settings are successful
Click [save] to complete the Settings
4.9 System information
4.9.1 System information
Click system configuration to access system information interface
Device serial number: display camera product serial number
Display resolution: the resolution of the camera screen
Software version: displays the current software version of the camera
Version description: description of the current software version
Face algorithm version: face recognition algorithm version used by the camera
Client version: the current client software version of the camera
4.9.2 Firmware upgrade
Click system configuration → system information → system upgrade to enter the interface
4.9.3 System Diagnosis
Click System Configuration-->System Information-->System Diagnosis
4.10 Access records
Query the history of the catch, export the record as needed, export the record including Excel file and the catch photo.
Set query time period: start time and end time
Select search type:
No additional information query: query all traffic records in the corresponding time period.
According to the type of access: list management, pass, id card, authorized passage, stranger access.
According to the list query: white list, blacklist, visitor list.
According to other information query: input name or id number query.
According to the slice query: to compare the search chart.
Retrieval, the query result is shown as follows: